Air Plants: No Soil Needed, but They Must Be Soaked
Air plant (Tillandsia) care guide: they live without soil, how to water by soaking, bright indirect light, drying after soaking to avoid rot, and display ideas.
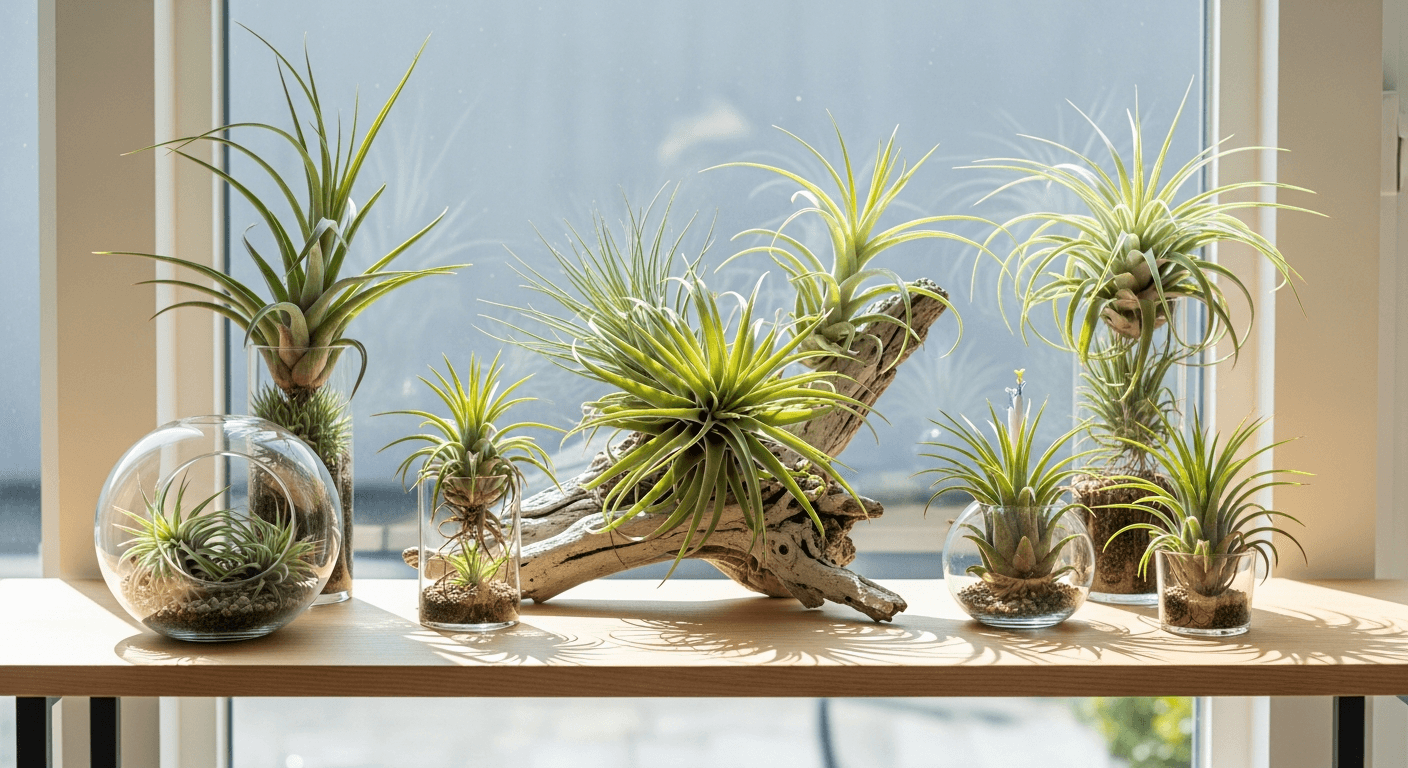
In this article
- What they are and why they need no soil
- Xeric vs. mesic: the split that explains everything
- Basic care, point by point
- Light
- Watering: the part everyone gets wrong
- The step that kills most air plants: drying
- Humidity and temperature
- Feeding
- Flowering and reproduction
- Display ideas (and how not to harm the plant)
- Common problems and fixes
Air plants (Tillandsia) are some of the most genuinely strange things you can keep at home, and I mean that as the highest compliment. They live with no soil at all, drink and feed through their leaves, and will happily sit on a piece of driftwood, perch in a glass bowl, or dangle from a thread in mid-air. As a collector who loves the why behind a plant, tillandsias are catnip: once you understand how they actually work, caring for them stops feeling like a guessing game and starts feeling obvious. This guide goes deep on the mechanics — light, soaking, and the one step that quietly kills more air plants than anything else.
What they are and why they need no soil
Tillandsias are epiphytes — plants that grow on other plants and surfaces rather than rooting into the ground. In the cloud forests and dry scrublands of the Americas, they cling to tree branches, telephone wires, and bare rock. Their roots are basically grappling hooks: anchors, not feeding organs. Some mature plants barely have roots at all.
So how do they eat and drink? Through their leaves. The entire surface is covered in microscopic scales called trichomes, which pop open when wet to pull in water and dissolved minerals, then seal shut to lock moisture in and reflect harsh sun. Those trichomes are the silvery, fuzzy sheen you see on many species — and they're the single most useful thing to read when you're deciding how to treat a given plant. They're close relatives of the bromeliad, which uses a central cup of water the same way; air plants just took the no-soil idea to its logical extreme.
Xeric vs. mesic: the split that explains everything
Air plants sort roughly into two camps, and knowing which one you're holding answers most care questions before you ask them.
- Xeric types (think T. xerographica, T. tectorum, T. caput-medusae) come from bright, dry habitats. They're heavily armored with silvery trichomes, want strong light, and tolerate going dry. Overwater these and they sulk.
- Mesic types (think T. bulbosa, T. butzii, T. brachycaulos) come from humid forests. They're smoother and greener, want softer light and more frequent water, and dry out fast in a heated room.
| Trait | Xeric (silver, fuzzy) | Mesic (green, smooth) |
|---|---|---|
| Native habitat | Bright, dry, exposed | Humid, shaded forest |
| Light | Bright; some direct OK | Bright indirect, gentler |
| Watering rhythm | Less often, drought-tolerant | More often, dries fast |
| Misting | Helps a lot | Helps, but not enough alone |
| Tell-tale look | Frosty, scaly leaves | Glossy, soft green leaves |
If you remember nothing else: the fuzzier and more silver it is, the more light and drought it can take.
Is your plant looking off and you are not sure why?
Free AI diagnosisBasic care, point by point
Light
Light is where most people accidentally starve their air plants. Because tillandsias look like decor, they often get parked on a shelf in the middle of a room — and then slowly fade over months.
- Ideal: bright, indirect light, within a few feet of a window. An east or west-facing sill behind a sheer curtain is the sweet spot.
- Tolerates: soft morning sun, and (for xeric silvers) a bit of gentle direct light.
- Avoid: intense, hot midday sun through unshaded glass, which scorches and dehydrates them in hours.
A reliable rule of thumb: if there isn't enough light to comfortably read a book where the plant sits, there isn't enough light for the plant. They can also grow under a basic LED grow light run 10–12 hours a day, which is how I keep a few going on a dim interior wall. If you want to dial this in properly, my notes on indoor plant light translate "bright indirect" into something you can actually measure.
Watering: the part everyone gets wrong
This is the heart of air plant care, so it's worth slowing down. You do not water tillandsias with a can, and misting alone almost never keeps them properly hydrated. You soak them.
- Fill a bowl with room-temperature water — rain, filtered, or tap left to stand overnight so the chlorine gasses off.
- Submerge the whole plant, leaves and all. Push floaters under with a finger or a spoon.
- Soak for 20 to 60 minutes. Twenty minutes suits thirsty mesic types; the heavily trichomed xerics can use the longer end.
- Lift it out, turn it upside down, and shake firmly to fling water out of the crown and leaf bases.
How often? As a starting point, soak once a week. But frequency is driven by your air, not the calendar. Dry, heated, or air-conditioned rooms might need twice a week; a humid bathroom might stretch to every 10 days. Let the plant tell you: a well-hydrated leaf is firm and slightly springy; a thirsty one curls inward, exaggerates its channel, and feels stiff and papery.
Between soaks, a misting on dry days is a nice supplement — especially for mesic species — but treat it as a snack, not a meal. The exception is the blooming or rooted-on specimen you can't easily detach: for those, mist heavily several times a week and soak when you can.
A word on water quality, because it matters more here than for potted plants: tillandsias absorb everything directly through their leaves, so softened water (high sodium) and heavily chlorinated water can burn leaf tips over time. Rainwater is genuinely the gold standard. Never use distilled or reverse-osmosis water as the only source long term, by the way — it's so mineral-free it can leach nutrients back out of the leaves.
The step that kills most air plants: drying
Here's the thing nobody warns beginners about. Air plants don't usually die of thirst — they die of rot, and rot starts with water trapped in the crown after a soak. A tillandsia that sits wet in the heart of its rosette will start to fall apart from the inside, and by the time the center turns brown and the leaves pull out with a gentle tug, it's already too late.
So drying is not optional. After every soak:
- Set the plant upside down on a towel, paper, or a dish rack so water drains out of the crown instead of pooling in it.
- Leave it somewhere with moving air until it's completely dry to the touch — about 2 to 4 hours. A fan, an open window, or just a breezy spot all work.
- Only then return it to its display. Never put a wet air plant back into a closed terrarium, a tight shell, or a low, stagnant nook.
This single habit — soak, shake, dry upside down — is 90% of keeping tillandsias alive. The species that have a bulbous base where leaves meet (the bulbosa group, for instance) are especially prone to crown rot, so be extra ruthless about shaking those out.
Humidity and temperature
Tillandsias enjoy medium-to-high humidity, roughly 50–70%, and temperatures between 60 and 82 °F (16–28 °C). They're not frost-hardy; anything near freezing will damage or kill them, so bring outdoor plants in well before cold nights.
In a dry, heated home in winter, you'll find yourself soaking more often and misting between — or simply moving plants to a bright bathroom or kitchen where ambient moisture is naturally higher. Counterintuitively, good airflow matters as much as humidity: high moisture with stagnant air is the perfect setup for rot, while a gentle breeze lets them stay damp without festering. If your home runs bone-dry, my guide to humidity for plants covers grouping, trays, and humidifiers that help.
Feeding
Air plants are slow, frugal growers, and they'll survive without fertilizer — but a little feeding noticeably improves color, growth speed, and flowering. A couple of times a month during spring and summer, add a heavily diluted bromeliad or specialty tillandsia fertilizer to the soak water at roughly a quarter of the label strength. More is not better here; their trichomes are easily overwhelmed.
Avoid generic houseplant feeds that are high in copper (toxic to bromeliads) or rely on urea nitrogen, which air plants can't readily use without soil microbes to convert it. Look for nitrate-based nitrogen on the label.
Flowering and reproduction
Flowering is the grand finale of a tillandsia's life — and I do mean finale. Each plant blooms only once, often spectacularly: the center can blush deep red or purple and push out a vivid flower spike in pinks, purples, and yellows. Many species change color dramatically just before blooming even if the flowers themselves are small.
After flowering, the mother plant slowly winds down — but not before it has children. It produces offsets called pups around its base, usually one to three. Let each pup grow to about a third to half the size of the mother before you gently twist it free; separating too early leaves it without enough mass to thrive on its own. You can also leave them attached to form a clump, which many growers actually prefer because clusters look lush and bloom in waves. The mother eventually withers, but the pups carry the line forward — so a single plant is effectively a small dynasty. If you enjoy this kind of reproduce-and-multiply payoff, you'll find the same satisfaction in orchid care, another epiphyte that rewards patience.
Display ideas (and how not to harm the plant)
Half the fun of tillandsias is that they go anywhere. A few favorites:
- Mounted on driftwood, cork, or grapewood. Attach with a dab of waterproof, plant-safe adhesive (E6000 silicone or a hot-glue dot at the base only) or, better, fishing line — and never glue over the crown or growing point.
- Open glass globes and bowls. Gorgeous, but only if they're open and airy. The plant must come out for soaking and go back fully dry.
- Hung in the air on monofilament for that floating, gravity-defying look they're named for.
- Nestled in shells, on stones, or in a wire frame. Just confirm there's no spot for water to collect underneath.
The two rules that protect the plant: keep the crown clear and exposed, and make sure it can dry out after every soak. Avoid copper wire and copper containers entirely — copper is genuinely toxic to these plants.
Common problems and fixes
Most air plant trouble traces back to water — too much, too little, or the wrong kind. Here's how to read the signs.
| Symptom | Likely cause | Fix |
|---|---|---|
| Soft, mushy, dark base; leaves pull out easily | Crown rot from trapped water | Usually fatal once advanced; salvage healthy pups, and always shake + dry upside down going forward |
| Leaves curling inward, exaggerated channel, stiff | Underwatered | Soak longer (up to 60 min) and more often |
| Brown, crispy leaf tips | Dry air or mineral-heavy / softened water | Raise humidity; switch to rainwater or filtered water |
| Pale, stretched, faded color | Too little light | Move closer to a bright window or add a grow light |
| Bleached or scorched patches | Too much direct sun | Pull back from hot midday glass |
| Bottom leaves drying off slowly | Normal aging, or post-bloom decline | Peel them away gently; check for pups at the base |
If the base feels soft and smells off, treat it like any internal rot and triage fast — the principles are the same ones I cover in the root rot guide, just applied to a plant with no roots to speak of.
A quick sanity check before you panic: gently squeeze a leaf. Firm and supple means hydrated and fine. Limp and hollow means thirsty. Slimy and dark at the base means you've got rot, and speed matters.
Still not sure what's going on with yours? Snap a clear photo and run it through our AI diagnosis tool — it's quick, and it'll point you in the right direction. And if you've caught the no-fuss-plant bug, take a look at our succulents guide for more species that forgive a forgetful waterer, or the Venus flytrap guide if you want to go full exotic-plant nerd like I did.
Related articles
Coffee Plant Care: Growing Coffea at Home
Coffee plant (Coffea arabica) care as a houseplant: bright indirect light, humidity, watering, and whether you can really harvest your own coffee beans.
Norfolk Island Pine Care: The Living Christmas Tree
Norfolk Island pine (Araucaria heterophylla) care: light, watering, humidity and why its branches turn brown and drop. The living indoor Christmas tree guide.
Aglaonema (Chinese Evergreen): The Complete Care Guide
Care guide for the Aglaonema or Chinese evergreen: light for the pink varieties, watering, humidity, propagation by division and its toxicity to pets.
Trouble with your plant?
AI diagnosis