Multiply Your Plants for Free: Four Methods That Work
Multiply your plants for free: water propagation, soil cuttings, division and pups. Learn which method to use for each plant and the tricks to get them rooting.
In this article
- The one concept that makes propagation click: the node
- The four propagation methods
- Method 1: Water propagation (the easiest and prettiest)
- Method 2: Cuttings straight into soil
- Method 3: Division
- Method 4: Pups and plantlets
- Which method for which plant?
- The science of getting cuttings to root
- Common mistakes (and the fixes)
- From cutting to thriving plant
Here is the thing nobody tells you when you buy your first plant: that plant is not one plant. It is a starter kit. With a clean cut and a little patience you can turn a single pothos into a dozen, fill every shelf in the house, and still have enough to give away. I started doing this years ago to bulk up my exotic patch on a budget, and propagation quickly went from a money-saving trick to my favorite part of the whole hobby. Watching a bare stem push out its first white root never gets old.
This guide covers the four methods that handle the vast majority of houseplants — water, soil cuttings, division, and pups — plus the science of why they work, exactly when to do it, and how to troubleshoot the cutting that just sits there sulking instead of rooting.
The one concept that makes propagation click: the node
Before the methods, the single most important word in this guide: node.
A node is the slightly swollen point on a stem where a leaf, a bud, or an aerial root emerges. It looks like a little knuckle or band. The reason it matters is biological: nodes contain meristematic tissue — clusters of undifferentiated cells that can become roots, shoots, or leaves depending on what the plant needs. The stem between two nodes (the internode) has none of that magic. It cannot make roots. Ever.
So when people say "my pothos cutting won't root," nine times out of ten the cutting has no node in the water. You can float a beautiful leaf with six inches of stem and wait a year — nothing will happen. Cut so that at least one node sits below the waterline or in the soil, and you are most of the way there.
Quick anatomy cheat:
| Part of the stem | What it is | Roots from it? |
|---|---|---|
| Node | Knuckle where a leaf/bud emerges | Yes — this is the engine |
| Internode | Smooth stem between nodes | No |
| Petiole | The little stalk connecting leaf to stem | No (a leaf + petiole alone won't root for most plants) |
| Aerial root nub | Brown/green stub at a node (Monstera, Philodendron) | Yes, and fast |
Some plants break this rule in fun ways — succulents and African violets can root from a single leaf — but for vining houseplants, "always include a node" is the law.
Is your plant looking off and you are not sure why?
Free AI diagnosisThe four propagation methods
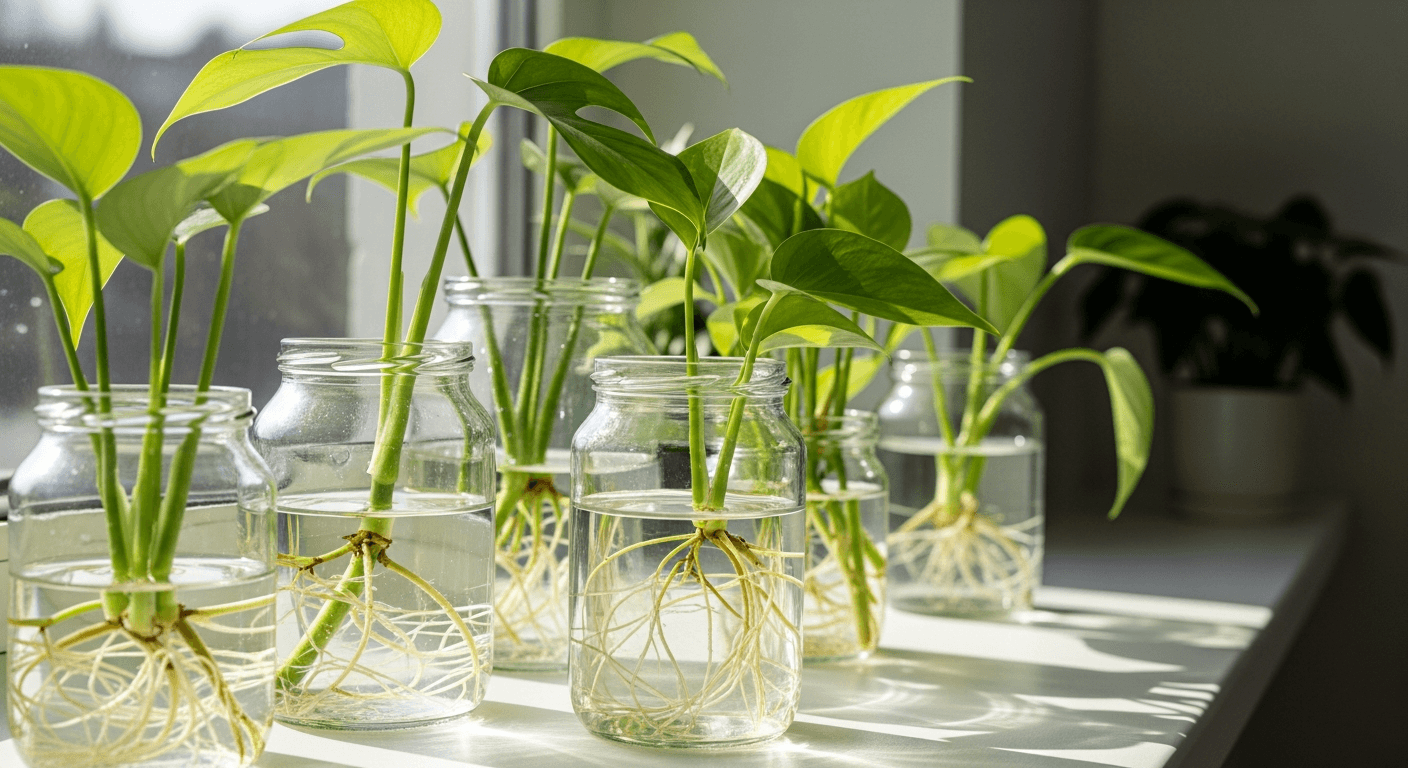
Method 1: Water propagation (the easiest and prettiest)
Ideal for pothos, philodendron, monstera, heartleaf, and spider plants — basically anything that vines or has visible nodes.
- Find a healthy stem and cut about a quarter-inch below a node with clean scissors. Take a piece with 2–3 leaves and at least one node.
- Strip off any leaf that would sit underwater — submerged leaves rot and foul the water.
- Put the node (or two) into a glass of clean room-temperature water, leaves up top, out of the water.
- Change the water every 3–4 days. Fresh water carries dissolved oxygen, and roots need oxygen to grow. Stale water is the number one cause of mushy cuttings.
- Set it in bright, indirect light and somewhere warm. Most cuttings root in 1–3 weeks; slower vines can take 4–6.
- When the roots reach 1–2 inches (2–5 cm), pot the cutting into soil.
The big appeal of water propagation is that you can see everything happening, which makes it perfect for beginners and kids. The trade-off: water roots are thin, white, and adapted to water, not soil. The longer you wait, the harder the transition. Pot up when roots hit 1–2 inches rather than letting them sprawl to six — those long water roots often die back and the plant resets anyway. Keep the soil consistently moist for the first two weeks after potting so the roots are not asked to switch environments cold turkey. If you want to understand the bright-but-not-direct light these cuttings want, my notes on indoor plant light break down exactly what counts as "bright indirect."
Method 2: Cuttings straight into soil
Slower to show results because you cannot see anything, but stronger in the long run — the roots are born adapted to soil, so there is no transplant shock later.
- Make the same cut, a quarter-inch below a node, with 2–3 leaves.
- Optional but helpful for woody or stubborn cuttings: dip the cut end in rooting hormone (it is just concentrated auxin, the same hormone the plant uses to trigger roots).
- Poke a hole in damp, airy potting mix — not dense garden soil — and bury the node. A blend with perlite or bark keeps it from compacting; see choosing and improving potting soil for mixes that drain well.
- Firm the soil gently and keep it lightly moist, never soggy.
- Raise the humidity. A clear plastic bag or a cut soda bottle over the pot makes a cheap mini-greenhouse, which keeps the leafless-rooted cutting from drying out before it can drink. Vent it daily so it does not go moldy.
- Give it bright indirect light, no direct sun. Tug very gently after 3–4 weeks — slight resistance means roots have formed.
This is my go-to for hoyas and woodier tropicals, where water roots tend to be flimsy. Speaking of which, if you are propagating a hoya, soil with a chunky orchid-bark component roots them noticeably faster than plain mix.
Method 3: Division
For plants that grow in clumps rather than on a single stem: snake plant, calathea, peace lily, ZZ plant, ferns, and most grassy growers. Division is technically the fastest method because you are not waiting for roots to form — they already exist. You are just splitting one root system into several.
- Water the plant the day before so the rootball slides out cleanly and the roots are hydrated.
- Lift the plant out and gently tease or shake soil off the roots so you can see the natural clumps.
- Split into two or more sections by hand, or with a clean knife for tough rhizomes. Each division must have its own roots AND its own growth points (shoots or leaves). Roots with no top, or a top with no roots, will not survive.
- Replant each division in its own pot at the same depth it was growing, and water it in.
Because the divisions already have functioning roots, recovery is quick — but they will still sulk for a week or two while they settle. Keep them out of harsh sun and do not fertilize until you see new growth. This is really just a repotting job with an extra step, so the same gentle-handling rules apply. Mild droop afterward is normal transplant adjustment, not failure.
Method 4: Pups and plantlets
Some plants do the propagating for you, which feels a bit like getting free plants in the mail.
- Spider plants send out long runners tipped with baby plantlets ("spiderettes"). You can snip one off and root it in water or soil, or — my preferred trick — pin the plantlet down into a small pot of soil while it is still attached to the mother. It roots with the security of the parent's water supply, and you cut the umbilical cord once it is established.
- Aloe, haworthia, and many succulents push up "pups" (offsets) at the base. Wait until a pup is a third to half the size of the parent and has a few of its own roots, then wiggle it free or cut it with a clean blade. If you tear roots, let the wound callus over for a day or two before potting to avoid rot. My aloe vera care guide goes deeper on pup timing.
- Bromeliads and air plants also throw pups after they flower; same rules apply.
Pups are the lowest-effort, highest-success method on this list. If a plant offers them, take them.
Which method for which plant?
| Plant type | Best method | Typical time to root |
|---|---|---|
| Pothos, philodendron, monstera | Water or soil cutting | 1–3 weeks |
| Hoya, woody tropicals | Soil cutting (+ hormone) | 3–6 weeks |
| Snake plant, ZZ, calathea, ferns | Division | Instant (already rooted) |
| Spider plant | Plantlet (runner) | 1–2 weeks |
| Aloe, succulents | Pups / offsets | Already rooted; callus first |
| Begonia, African violet | Leaf cutting | 4–8 weeks |
The science of getting cuttings to root
A cutting is racing against the clock. It has been severed from its water and energy supply, so it is using stored reserves to build roots before it dries out or rots. Everything below tips that race in the plant's favor.
- Timing — propagate in spring and summer. During active growth, hormone levels and stored energy are high, so roots form fast. A cutting taken in the dead of winter can sit dormant for months. (If you must propagate off-season, warmth and a grow light help compensate.)
- Warmth at the roots. Most tropicals root best around 70–75 °F (21–24 °C). Cold slows or stalls root formation. A spot on top of the fridge or near a warm wall works; a seedling heat mat is the deluxe option.
- Humidity around the leaves. A cutting with no roots cannot replace water it loses through its leaves, so high humidity buys it time. This is exactly why the bag-over-the-pot trick works — and why my humidity guide is worth a look if your home runs dry.
- Clean tools. Wipe blades with rubbing alcohol between cuts. An open wound is an open door for bacteria and fungi; a clean cut seals and roots, a dirty one rots.
- Bright, indirect light — never direct sun. The cutting needs light to photosynthesize and fuel root growth, but direct sun on a rootless cutting cooks and dehydrates it. A cutting kept too dark, on the other hand, gets leggy and weak before it ever establishes.
- Patience and a hands-off policy. If the stem stays firm and green, it is fine even with no visible roots yet. Constantly pulling it out to "check" snaps the fragile new root hairs and resets the whole process.
Common mistakes (and the fixes)
| Problem | Likely cause | Fix |
|---|---|---|
| Cutting won't root, stem stays firm | No node submerged, or cold/dark spot | Recut to include a node; move somewhere warm and bright |
| Stem turns mushy, brown, smelly | Stale water or soggy soil — it is rotting | Toss it, recut higher into firm tissue, change water more often |
| Roots grow then plant fails after potting | Long water roots dying off in soil | Pot up at 1–2 in. roots; keep soil moist for 2 weeks |
| White mold on soil cutting | Mini-greenhouse never vented | Open the bag daily for airflow |
| Leaves yellow and drop on the cutting | Normal stress, OR rot starting | Check the stem; firm = wait, mushy = start over |
| Nothing happens for months | Propagating in winter dormancy | Wait for spring, or add bottom heat and a grow light |
A note on rot, because it is the killer here: rot starts at the cut end and creeps up. The moment a stem feels slimy or soft, that section is gone — but you can often rescue the cutting by slicing back to firm, green tissue and restarting in clean water. Tropicals especially are prone to this when conditions stay too wet and cold; the same dynamics that cause root rot in mature plants, and damping-off in seedlings, are at work in a propagation jar.
From cutting to thriving plant
Rooting is only half the job. A freshly potted cutting has a small, delicate root system, so treat it like a seedling for the first month: consistent moisture, no fertilizer (it can't use much and the salts can burn tender roots), bright indirect light, and a little extra humidity. Wait for the second flush of new leaves before treating it like a normal adult plant. Cuttings of monstera deliciosa and other big aroids especially reward this slow hardening-off — rush them into a sunny window straight from the jar and they sulk.
Start with a single pothos cutting in a glass of water on the windowsill. Once you watch that first root unfurl, I promise you will start eyeing every plant in the house as raw material. If a cutting is misbehaving and you cannot tell whether it is rotting, drying, or just being slow, snap a photo and run it through the AI plant diagnosis — it will help you read the symptoms before you give up on it.
Related articles
Syngonium (Arrowhead Plant): Care Guide
How to care for syngonium (arrowhead plant): light for variegation, watering, training it to climb or stay bushy, easy propagation, and toxicity to pets.
Tradescantia (Wandering Dude): Care Guide
How to care for tradescantia (zebrina, purple heart): bright light for color, watering, pinching to keep it full, super easy propagation, and toxicity.
Pilea peperomioides: Care for the Chinese Money Plant
Pilea peperomioides (Chinese money plant) care: light, watering, why it makes so many pups and how to propagate it. Round, easy and pet-friendly.
Trouble with your plant?
AI diagnosis